Here is how to upload a windows server 2012 r2 ISO to Vultr to get a windows VPS very cheap! Vultr is a trusted and reliable cloud computing business with a massive range of locations and vps sizes.
** Updated guide for server 2019 or here for Windows Server 2016 ISO or Windows 10 pro, No driver config needed!
Promo get a free $100 on new Vultr accounts here limited time!

Windows servers cost extra but there is a way to get Windows server for no extra charge, it involves using a custom ISO file. With this method you can have a windows server for $5 per month in a massive range of locations including Australia!
The first step if you don’t already have a Vultr account is to sign up, sign up here to get free credits.
Now navigate to the deploy server section; You need to upload the custom iso, use this link here or make your own and host it.
Go to section 2 (Server type) and click the “Upload ISO” tab and then the “Upload ISO” button below it, add in the url and click upload (you’ll have to wait a few minutes for it to upload).

Go back up and choose your server location, Obviously you’d want a location close to you to prevent frustrating latency issues.
By now the ISO should have loaded make sure its selected (2012r2.iso). Now choose your instance size (amount of SSD space, ram and cpu). Do note that Windows server 2012r2 runs fine on the $5 p/m option.
Dont worry about any of the other options, type in a server name and click “Deploy now”.
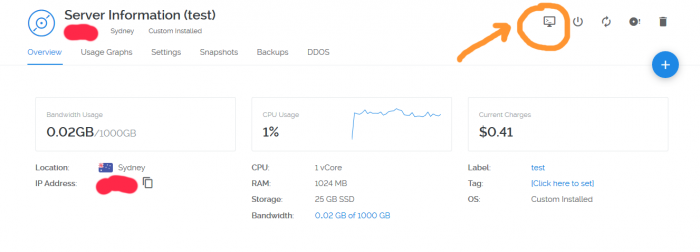
Navigate to the server information page for the server you just deployed. You will have to wait up to 10 minutes for the ISO to me mounted, once it has click the little computer screen in the upper right to view the console.
Either read these next instructions or follow along and pause this video (added below too)
Installing windows server 2012 r2 on vultr
Choose your language, time and keyboard click next then install now

Choose the last option Windows Server 2012 r2 Datacenter evaluation (Server with a GUI) Click next and accept the terms, click next.

Click Custom: install windows only (advanced)

Click the cd icon near the bottom left which says load driver
Click browse
Click the CD drive (D:) iso
Click the Virtio folder

Click the WIN8 folder
Click the AMD64 Folder and click ok

Now click Red Hat VirtIO SCI controller (middle option)

Click next and make sure a drive with enough space is selected, click next and wait a few minutes for the install.
Once the server restarts choose a password and click finish
Click the “send CtrlAltDel” button on the top left
Type in your password you just set and press enter.
Network configuration
Go to control panel and click “Hardware” then click device manager.
Find the other devices section where your Ethernet controller and PCI device has an error symbol
Right click Ethernet controller and click “update driver software…”

Click “Browse my computer for driver software” then click browse
Expand CD Drive (D:) iso and click the Virtio folder followed by ok

Now click next and install on the pop up
Click yes for when it asks for device to automatically connect to this network

Now you will see under network adapters in device manager it has “Red Hat VirtIO Ethernet controller”
Now right-click on the PCI device and click “update driver software...”
Click “Browse my computer for driver software” if it has D:\Virtio in the bar then click next. It will be a success and don’t worry about doing the last PCI device.
Enabling remote desktop connection
To enable you to connect to the server using the rdp program, open server manager and navigate to the local server tab.
Find where it says Remote desktop Disabled

Click disabled and then tick “allow remote desktop connections to this computer” Click apply and then ok.
Now click manage in the top right, add roles and features
Keep clicking next until you come to Server roles, tick Remote Desktop Services and keep clicking next until you come to Role services.

Tick remote desktop session host the click add features

Click next and then install.
The install will take about a minute once done restart your server. Now you can connect to it through the Remote desktop connection program and app by using the ip address, the username administrator and the password you set.
If you thought following these instructions was hard here is the video of me doing it, just pause if you fall behind.